Breeding technology of guinea fowl in adult stage
One: feeding preparation
The preparation work before the breeding period of guinea fowl is basically the same as the preparation work before the brooding period. The temperature of the guinea fowl growing house is not as high as that of the brooding house. There are also certain differences between the adjustment and maintenance of chicken cages in the brooding house and the brooding house. The height and number of drinking and feeding appliances should be adjusted in the brooding house.
Two: transfer group
The transfer of guinea fowl from the young chicken house to the middle or large chicken house is called transfer group. The chicken house should be thoroughly disinfected before transferring. The following tasks should be done during group transfer: ① Anti-stress drugs and additives such as instant multi-dimensional, vitamin C and Huojian should be added to the feed for 1 week before and after transfer. ② Beaks should be cut off and vaccinated before and after transfer. ③ The group should be transferred 1 to 2 weeks before the start of labor. The breeding males should be transferred to the breeding cock or breeding house 2 weeks in advance, so that the males and females can maintain the dominant position after the males and females are combined. Weigh and divide into groups while transferring groups, so as to decide the feeding management plan according to the body weight development. The transfer should be carried out at night. When transferring out of the chicken coop, the lights should be dimmed or turned off. When transferring into the chicken coop, the lights should be turned on all night to prevent the chickens from being transferred to a new environment and causing death due to crowding. ④ The feed is cut off 3 hours before the group transfer, and the water is cut off for 2 hours. When transferring the group, use the transfer cage and the transfer cart to prevent damage to the chickens. If you use a motor vehicle to transfer the group to avoid turning on lights and horns, turn on the lights in the adjacent house, add materials and water to the chicken house, and observe the chickens frequently for 1 to 3 days after transferring to ensure that each chicken can eat the feed and Drink water. ⑤ After the transfer, the brooding house should be cleaned and disinfected in time, and the brooding house should be left vacant for 2 weeks to cut off the vertical transmission of microorganisms to facilitate the next brooding.
Three: daily management
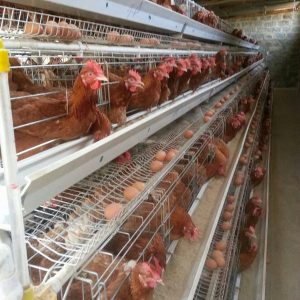
The procedures and methods are as follows: ① In the morning, the breeders can enter the chicken house after bathing and disinfecting and changing their work clothes, work caps and work shoes. First turn on the lights and adjust the working fan, and then add the ingredients within 30 minutes, and observe the flocks while adding the ingredients. Wash the sink after feeding, add enough clean water. To observe the flock in the morning, first observe the feeding and drinking behavior. **After adding the chicken, the chickens are eager to eat, and they have a strong appetite. They eat in a row at the trough, indicating that the chickens are healthy. Those chickens that stand or lie down in the cage after eating a few bites of feed are definitely sick and should be picked out in time. Secondly, it depends on the color and shape of feces. Feces are formed and the color is normal, which is a healthy chicken; if the feces are thin and the color is green or yellow, it means that the chicken is sick and should be diagnosed by the veterinarian. Observe again whether the corns are tearing, whether there are swelling or cysts on the head, whether they have neck extension or nerve symptoms, and whether the reaction is sensitive. ② Clean the manure regularly to keep the air in the chicken house fresh. The ground should be cleaned and disinfected at the end of each manure removal. ③ After going to work at noon, check the eating and drinking status of the chickens, and check whether there is any abnormality in the feed intake and water intake compared with usual. Replenish the ingredients in time after eating. Refine feed in places with more feed; if all feed is eaten cleanly, stop feed for 20-30 minutes and add the next feed. Add water to the water tank while feeding. Inspect and repair chicken coops, sinks and feeders. ④ Observe the chickens at night. Turn off the lights at night and enter the chicken house after 20-30 minutes, and listen carefully to see if the breathing sound of the chickens is normal. An abnormal sound was found, indicating a sick chicken. Pick out diseased chickens for diagnosis and observation to determine whether it is an infectious disease or a common disease. If individual chickens become ill, if it is an infectious disease, diagnose and treat immediately.
Four: Control the feeding and change the feed at the right time. Choose the suitable feed according to the age.
Five: scientifically compound feed
Change the feed at the right time According to the physiological and nutritional characteristics of the guinea fowl during the growing period, select appropriate feed materials, scientifically modulate the feed, and change the feed in time according to the growth status. The feed of guinea fowls during the growing period can be appropriately added with high-quality forage hay powder, sweet potato leaf powder, locust leaf powder, peanut seedling powder and other hay powder and rice bran, as well as green vegetables or grass. Change the feed gradually every time you change the feed to prevent sudden change of feed from causing pecking and anorexia. The specific method is: on the 1st to 2nd day, 2/3 of the old material is mixed with 1/3 of the new material; on the 3rd to 4th day, 1/2 of the old material is added with 1/2 of the new material; mixed feeding; on the 5th to 6th Today, 1/3 of the old material is mixed with 2/3 of the new material. **After all, replace them with new materials. After changing the feed, observe the chickens’ appetite, feed intake, water consumption, feather shape, mental state and feces for abnormalities. If an abnormal phenomenon is found, the cause should be immediately identified and measures should be taken in time to avoid economic losses.
Six: adequate drinking water
Water is the cheapest substance in chicken production, and lack of water will seriously affect the feed intake and growth of guinea fowls. The widespread application of automatic drinking water systems greatly reduces the labor intensity of workers. However, due to obstruction or blockage of automatic drinking water systems or water supply systems, water shortages and water cuts may be caused, which may cause huge economic losses to chicken production. Breeders should always observe whether there is water in each cup drinker; point the nipple drinker with their hands to observe whether there is water; observe whether there is water in each position of the sink or whether the chickens can drink water; observe whether the water level in the water tank meets the requirements. Flat-raised guinea fowls should add water regularly.
Seven: create a good environment
Environmental factors that affect the normal growth of guinea fowls include temperature, relative humidity, air quality, ventilation, light, dust in the house, feeding density, feed nutrition, microorganisms, drinking water, noise and other factors.
1) Temperature The temperature in the early stage of incubation should not be lower than 18℃. As the age increases, the adaptability and tolerance of guinea fowls to low temperature increase.
2) Relative humidity The guinea fowls are more adaptable to humidity during the growing period. Generally, the relative humidity is 60%. In winter, the amount of heat preservation and ventilation is reduced. In summer, wet curtain cooling and spray cooling will cause the relative humidity in the house to exceed 90%. High temperature, high humidity, low temperature and low humidity are not good for the chicken body, which weakens the resistance of chickens, reduces immunity, and is susceptible to respiratory diseases or colibacillosis.
3) Air quality Exhaust harmful gases and dust in the house, supply fresh air in the house, so that there is sufficient oxygen in the house, the concentration of ammonia gas will drop below 20 mg/kg, and the content of hydrogen sulfide gas will drop below 6.6 mg/kg . Ventilation can reduce the suspended dust in the air in the house and reduce the microbial content in the house, which is beneficial to the health of the chickens. Practice has proved that the probability of developing colibacillosis and chronic respiratory diseases in flocks with good ventilation and fresh air in the house is reduced; the combs are bright red and the flocks are in good spirits.
4) Microorganisms Strengthen ventilation, discharge dust in the house and reduce microorganisms in the house. Spray disinfection regularly to kill the microorganisms suspended in the air and the microorganisms on the cage, wall and floor of the house.
5) Noise keep the environment quiet and stable, reduce noise pollution; keep the house quiet and stable to prevent outsiders and animals from entering the chicken house; prevent the pollution of the chicken house by noises such as cannons and horns, and avoid death and growth caused by frights Obstacles, decreased immune function.